- +Quick assembly and installation video
- +How to assemble the flexible phone mount?
- +What are the buttons on the in-line controller for?
From left to right:
1. Increase Brightness
2. Mode Selection
3. Decrease Brightness
4. On/Off- +How do I use the attachments?
Phone mount
Camera mount
- +How do I use the remote control to change the color temperature and brightness levels?
On the control pad, press up and down to adjust the brightness, or left and right to adjust the color temperature.
- +What do the buttons on the remote control do?
The power button at the very top is the on/off switch. Pressing the up and down arrows adjusts brightness; left and right adjusts color temperature. The center button cycles through lighting preset modes.
- +How do I assemble the flexible gooseneck phone mount?
Unscrew the plastic cap on the phone mount. Insert the ball at the end of the gooseneck arm into the socket and replace the cap. Attach the hot shoe adaptor at the end of the gooseneck arm.
- +How do I convert the ring light stand into a selfie stick?
Remove the screw cap from the end of the light stand, slide out the tripod assembly from the light stand to turn the light stand into a selfie stick.
- +What are the different touch panel functions?
The buttons next to the “K” are for adjusting the color temperature, and the buttons next to the light bulb icon are for adjusting brightness levels. Hold down the Streamplify logo to turn on/off the light.
- +What are the USB ports for on the back of the ring light?
For charging phones or other USB-enabled devices.
- +How do I use the attachments?
- +Why is my image mirrored on video calls? (Skype, Google Meet, Team, etc)
On most of the communication software, the preview image will be mirrored, but all other participants would see the correct orientation, and the written text would be readable by the participants.
- +Why is my video flickering?
Basically it has something to do with the power frequency used in your country, which in turn causes light to flicker at the same frequency. Some countries use 60 hertz (NORTH AMERICA) while some use 50 hertz (MOST OF EUROPE & ASIA), so adjust your camera’s frequency to either 50 or 60 Hz to prevent flickering.
For users whose system and software setting does not allow camera frequency setting adjustment, adjust frame rate until the flicker is gone.
If you are still seeing some video flickering after adjusting the Powerline frequency or the frame rate, please contact tech support and provide a sample of your video for trouble shooting.
- +Why is there some small flickering when using CAM in dim places or aimed at darker colored clothes?
The flicker (not related to power frequency setting) is due to the auto light enhancement feature of the CAM. it will disappear once a light source is used to add more light.
- +How do I adjust camera property? The App I am using does not have this option.
Some applications such as Discord or Google Meet do not allow for Camera Properties to be modified so you can reduce video flickering. In this case, you would need to use a third party app such as Skype or OBS Studio or Windows Camera App to change the frequency setting.
For example:
- On Windows Camera App, go to settings, Videos, and toggle the frequency in “Flicker reduction” option.
- On Skype, go Settings → Audio & Video → Webcam settings→”PowerLine Frequency”
- On Obs Studio, go to the “Properties” for the CAM, select “Configure Video”, adjust ”PowerLine Frequency” option.
- +Quick troubleshooting steps for CAM
If error messages such as USB devices not recognized, or no video capture hardware message were encountered, or that connection is not stable.
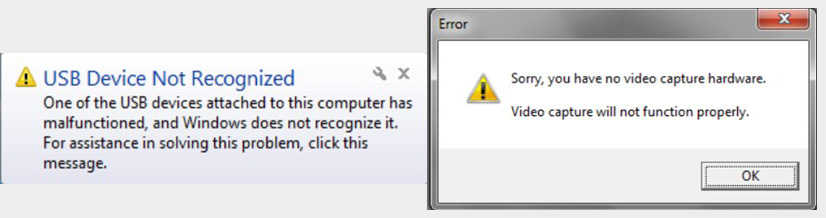
Step 1. Try other USB ports or PC. Use a different USB cable if possible.
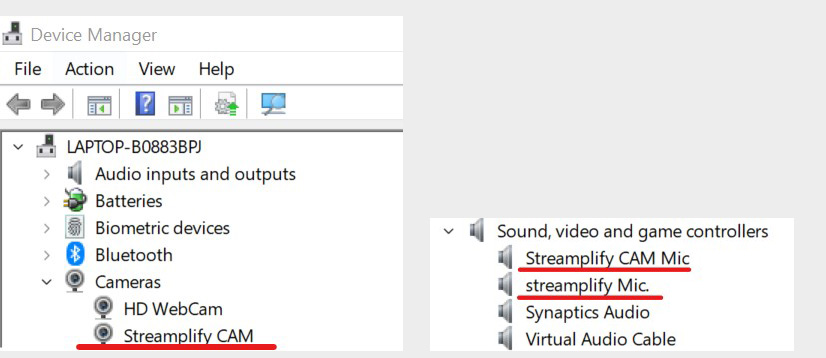
Step 2. Verify that the Streamplify CAM/MIC is showing up in Device Manager.
- If the Streamplify products show up in Device Manager, the products should be working, and it is likely software settings is preventing the CAM/MIC from working as intended.
- Press “Window” + “X” key simultaneously, select Device Manager.
- Locate Streamplify CAM under Cameras or Streamplify MIC/CAM MIC under Sound, video, and game controllers.
Step 3. Set device as default or disable all other input device.
- For Audio, in Windows setting-> System->Sound, make sure Streamplify MIC is selected as the input device (you can also select MIC as the output device if you desire and connect a headset though the MIC audio monitoring jack).
- For Camera, in Windows setting->Bluetooth & devices->Cameras, select Streamplify CAM, and see if it is working. You can select the other cameras and select Disable to ensure CAM is the default camera.
- If you do not see this option to set the device as default, you can also disable all other devices in Device Manager.
Step 4. Update Drivers
- Streamplify CAM/MIC use generic Windows USB drivers. To update drivers, open Device Manager (“Window”+”X” then select Device Manager)
- Right click on the Streamplify CAM/MIC and select Update Driver.
- Follow the steps here
- +How do I install the mic and the pop filter correctly into the mic holder?
- +How do I install the mic holder onto the arm? (Mic Arm)
- +How do I install the mic holder onto the Tripod? (Mic Tripod)
- +How do I mute the mic?
The volume control knob also acts as a button for muting and changing audio input profiles. Press the knob in once to mute. The LED next to the dial will turn red to indicate the microphone is actively muted.
- +How do I change between Podcast mode (Blue LED) and Gaming Mode (Green LED)?
The volume control knob also acts as a button for muting and changing audio input profiles. To change between profiles, press down on the knob until ring LEDs flash either green or blue in color. To switch profiles, the mic must NOT be muted.
- +Which mode should I select?
Podcast mode will capture a wider sound profile, including ambient sound, which we recommend for podcasting or singing. Gaming mode will filter out ambient noise and focus on your voice, so use it for conference calls or when streaming gameplay.
- +How do I keep my mic from tipping over? (MIC TRIPOD)
Position the mic directly over one of the tripod legs.
- +How do I change the ring LED lighting mode?
Press the LED control button to cycle through the lighting modes.
- +Quick troubleshooting steps for MIC
If error messages such as USB devices not recognized, or no video capture hardware message were encountered, or that connection is not stable.
Step 1. Try other USB ports or PC. Use a different USB cable if possible.
Step 2. Verify that the Streamplify CAM/MIC is showing up in Device Manager.
- If the Streamplify products show up in Device Manager, the products should be working, and it is likely software settings is preventing the CAM/MIC from working as intended.
- Press “Window” + “X” key simultaneously, select Device Manager.
- Locate Streamplify CAM under Cameras or Streamplify MIC/CAM MIC under Sound, video, and game controllers.
Step 3. Set device as default or disable all other input device.
- For Audio, in Windows setting-> System->Sound, make sure Streamplify MIC is selected as the input device (you can also select MIC as the output device if you desire and connect a headset though the MIC audio monitoring jack).
- For Camera, in Windows setting->Bluetooth & devices->Cameras, select Streamplify CAM, and see if it is working. You can select the other cameras and select Disable to ensure CAM is the default camera.
- If you do not see this option to set the device as default, you can also disable all other devices in Device Manager.
Step 4. Update Drivers
- Streamplify CAM/MIC use generic Windows USB drivers. To update drivers, open Device Manager (“Window”+”X” then select Device Manager)
- Right click on the Streamplify CAM/MIC and select Update Driver.
- Follow the steps here
- LIGHT 10
-
- +Quick assembly and installation video
- +How to assemble the flexible phone mount?
- +What are the buttons on the in-line controller for?
From left to right:
1. Increase Brightness
2. Mode Selection
3. Decrease Brightness
4. On/Off- +How do I use the attachments?
Phone mount
Camera mount
- LIGHT 14
-
- +How do I use the remote control to change the color temperature and brightness levels?
On the control pad, press up and down to adjust the brightness, or left and right to adjust the color temperature.
- +What do the buttons on the remote control do?
The power button at the very top is the on/off switch. Pressing the up and down arrows adjusts brightness; left and right adjusts color temperature. The center button cycles through lighting preset modes.
- +How do I assemble the flexible gooseneck phone mount?
Unscrew the plastic cap on the phone mount. Insert the ball at the end of the gooseneck arm into the socket and replace the cap. Attach the hot shoe adaptor at the end of the gooseneck arm.
- +How do I convert the ring light stand into a selfie stick?
Remove the screw cap from the end of the light stand, slide out the tripod assembly from the light stand to turn the light stand into a selfie stick.
- +What are the different touch panel functions?
The buttons next to the “K” are for adjusting the color temperature, and the buttons next to the light bulb icon are for adjusting brightness levels. Hold down the Streamplify logo to turn on/off the light.
- +What are the USB ports for on the back of the ring light?
For charging phones or other USB-enabled devices.
- +How do I use the attachments?
- CAM
-
- +Why is my image mirrored on video calls? (Skype, Google Meet, Team, etc)
On most of the communication software, the preview image will be mirrored, but all other participants would see the correct orientation, and the written text would be readable by the participants.
- +Why is my video flickering?
Basically it has something to do with the power frequency used in your country, which in turn causes light to flicker at the same frequency. Some countries use 60 hertz (NORTH AMERICA) while some use 50 hertz (MOST OF EUROPE & ASIA), so adjust your camera’s frequency to either 50 or 60 Hz to prevent flickering.
For users whose system and software setting does not allow camera frequency setting adjustment, adjust frame rate until the flicker is gone.
If you are still seeing some video flickering after adjusting the Powerline frequency or the frame rate, please contact tech support and provide a sample of your video for trouble shooting.
- +Why is there some small flickering when using CAM in dim places or aimed at darker colored clothes?
The flicker (not related to power frequency setting) is due to the auto light enhancement feature of the CAM. it will disappear once a light source is used to add more light.
- +How do I adjust camera property? The App I am using does not have this option.
Some applications such as Discord or Google Meet do not allow for Camera Properties to be modified so you can reduce video flickering. In this case, you would need to use a third party app such as Skype or OBS Studio or Windows Camera App to change the frequency setting.
For example:
- On Windows Camera App, go to settings, Videos, and toggle the frequency in “Flicker reduction” option.
- On Skype, go Settings → Audio & Video → Webcam settings→”PowerLine Frequency”
- On Obs Studio, go to the “Properties” for the CAM, select “Configure Video”, adjust ”PowerLine Frequency” option.
- +Quick troubleshooting steps for CAM
If error messages such as USB devices not recognized, or no video capture hardware message were encountered, or that connection is not stable.
Step 1. Try other USB ports or PC. Use a different USB cable if possible.
Step 2. Verify that the Streamplify CAM/MIC is showing up in Device Manager.
- If the Streamplify products show up in Device Manager, the products should be working, and it is likely software settings is preventing the CAM/MIC from working as intended.
- Press “Window” + “X” key simultaneously, select Device Manager.
- Locate Streamplify CAM under Cameras or Streamplify MIC/CAM MIC under Sound, video, and game controllers.
Step 3. Set device as default or disable all other input device.
- For Audio, in Windows setting-> System->Sound, make sure Streamplify MIC is selected as the input device (you can also select MIC as the output device if you desire and connect a headset though the MIC audio monitoring jack).
- For Camera, in Windows setting->Bluetooth & devices->Cameras, select Streamplify CAM, and see if it is working. You can select the other cameras and select Disable to ensure CAM is the default camera.
- If you do not see this option to set the device as default, you can also disable all other devices in Device Manager.
Step 4. Update Drivers
- Streamplify CAM/MIC use generic Windows USB drivers. To update drivers, open Device Manager (“Window”+”X” then select Device Manager)
- Right click on the Streamplify CAM/MIC and select Update Driver.
- Follow the steps here
- MIC General
-
- +How do I install the mic and the pop filter correctly into the mic holder?
- +How do I install the mic holder onto the arm? (Mic Arm)
- +How do I install the mic holder onto the Tripod? (Mic Tripod)
- +How do I mute the mic?
The volume control knob also acts as a button for muting and changing audio input profiles. Press the knob in once to mute. The LED next to the dial will turn red to indicate the microphone is actively muted.
- +How do I change between Podcast mode (Blue LED) and Gaming Mode (Green LED)?
The volume control knob also acts as a button for muting and changing audio input profiles. To change between profiles, press down on the knob until ring LEDs flash either green or blue in color. To switch profiles, the mic must NOT be muted.
- +Which mode should I select?
Podcast mode will capture a wider sound profile, including ambient sound, which we recommend for podcasting or singing. Gaming mode will filter out ambient noise and focus on your voice, so use it for conference calls or when streaming gameplay.
- +How do I keep my mic from tipping over? (MIC TRIPOD)
Position the mic directly over one of the tripod legs.
- +How do I change the ring LED lighting mode?
Press the LED control button to cycle through the lighting modes.
- +Quick troubleshooting steps for MIC
If error messages such as USB devices not recognized, or no video capture hardware message were encountered, or that connection is not stable.
Step 1. Try other USB ports or PC. Use a different USB cable if possible.
Step 2. Verify that the Streamplify CAM/MIC is showing up in Device Manager.
- If the Streamplify products show up in Device Manager, the products should be working, and it is likely software settings is preventing the CAM/MIC from working as intended.
- Press “Window” + “X” key simultaneously, select Device Manager.
- Locate Streamplify CAM under Cameras or Streamplify MIC/CAM MIC under Sound, video, and game controllers.
Step 3. Set device as default or disable all other input device.
- For Audio, in Windows setting-> System->Sound, make sure Streamplify MIC is selected as the input device (you can also select MIC as the output device if you desire and connect a headset though the MIC audio monitoring jack).
- For Camera, in Windows setting->Bluetooth & devices->Cameras, select Streamplify CAM, and see if it is working. You can select the other cameras and select Disable to ensure CAM is the default camera.
- If you do not see this option to set the device as default, you can also disable all other devices in Device Manager.
Step 4. Update Drivers
- Streamplify CAM/MIC use generic Windows USB drivers. To update drivers, open Device Manager (“Window”+”X” then select Device Manager)
- Right click on the Streamplify CAM/MIC and select Update Driver.
- Follow the steps here